blob: 03001e50ac66367eaddc4805f5f37cd5b8b92786 (
plain) (
tree)
|
|
## Using KerberosSDR with KrakenSDR Software
KerberosSDR is compatible with the new KrakenSDR software. The following describes how to set up your KerberosSDR to work with the KrakenSDR software.
#### KerberosSDR BOOTING NOTE
(We note that the following problem may be actually fixed with the latest Pi 4 Firmware, but will leave this information here in case people continue to experience this issue). The Pi 4 hardware has a problem where it will not boot if a powered USB hub drawing current from the Pi 4 is plugged in. Inside the KerberosSDR is a powered USB hub and hence the Pi 4 will not boot if the KerberosSDR is plugged in. So please plug the KerberosSDR in after booting. For the KrakenSDR the hardware implementation forces external power only, so this problem does not occur.
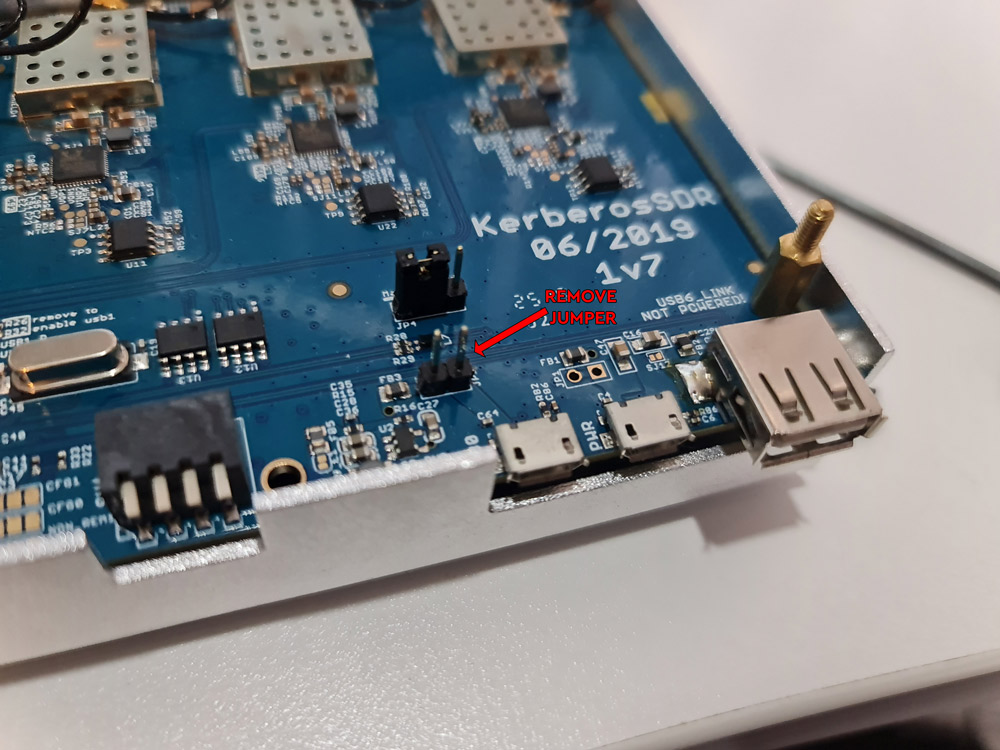
We strongly recommend making a small modification by removing a jumper on the KerberosSDR PCB to avoid this Pi 4 issue. This modification force external power only on the KerberosSDR by opening the enclosure, carefully removing the top calibration board, and then removing the `JP2` jumper from the PCB.

#### KerberosSDR EEPROM Update
For KerberosSDR users you will need to initially flash the EEPROM to use the new serial numbering scheme. Connect a monitor and boot up the image file. The code will not start as the EEPROMs are incorrect.
There is a script in `~/krakensdr_doa/heimdall_daq_fw/util/eeprom_init.sh` that can guide your through this. Just plug in your KerberosSDR (ensuring it is powered from the power port), and run the script `./eeprom_init.sh`. The script will guide you to use the DIP switches to turn all units off, except the currently requested tuner. It will then flash the realtek_oem firmware, then the serial number, before asking you to turn off that tuner, and turn on the next one. Answer `Y` each time it asks to flash.
Once the EEPROM is flashed you can reboot and follow the reconfiguration step below.
#### KerberosSDR Reconfiguration (For DoA Software)
The image is currently set up for the KrakenSDR. For KerberosSDR users, please update the EEPROM as described above first, then reboot. Once the web interface has loaded, expand the "Basic DAQ Settings" by clicking on the checkbox. Under "Preconfigured DAQ Files" select "kerberosSDR_default", and then click on "Reconfigure and Restart DAQ chain". This may take a minute or so, but after it's completed the software should connect and begin processing.
#### KerberosSDR Reconfiguration (For PRSoftware)
For the Passive Radar software you can use the same "pr_" prefixed preconfiguration files as used by the KrakenSDR.
#### KerberosSDR Retuning
The KrakenSDR code is designed to autocalibrate phase on each retune. Unfortunately this feature is not available on the KerberosSDR due to the lack of a noise source switching circuit. So with the KerberosSDR every time you change the frequency or DAQ settings, you must make sure that you have the antennas disconnected. (NOTE: This is only a problem for the DoA software which requires sample and phase calibration. For PR only sample calibration is required, and hence retuning should be fine without needing to disconnect antennas.)
Also if you make any custom changes to the DAQ settings (which is not recommended), always ensure that `Calibration Track Mode` is set to `No Tracking` otherwise the software will attempt to recalibrate every X-minutes.
Once you've set the center frequency, you can connect your antennas. In the Spectrum screen you can use 'click to tune' to tune to any frequency within the active bandwidth without needing to recalibrate.
|
